A couple of weeks ago it was my 22nd birthday, and I feel so spoilt! I had so many beautiful things, and so many beauty products, so I thought I'd share them with you and review them a little too!
This is it! Loads of candles, fragrances, makeup and a very pretty scarf. Something I won't mention in the rest of the post is the Soap and Glory Scent-sationalism gift set (I forgot to take a separate picture). They smell great! This is a combination of musk (Mist you Madly), floral (Glam-a-lot) and fruity (Girligo) scents, so perfect for any time and any occasion.
Body shop always do lovely smelling stuff, so I was really happy about this gift set in strawberry, which had shower gel, body polish, bar soap and a bath lilly in it. I also got the two body butters from other present givers, but I thought I'd chuck it in this one. The orange one smells divine.
Don't you just love the smell of Cath Kidston stuff? It smells so fresh, like you've just walked through a meadow. This manicure set is no different. The scent is literally 'blossom', and all the elements combine to give you some lovely smooth hands. It consists of cuticle cream, hand cream, hand scrub and a nail file.
Ahh candles. I love them, especially when they're fragranced, which of course all of these are. So I got this gorgeous set of cupcake candles (which smell of something, but I have no idea what) from my mum to go with my tea party theme. The french lavender tea lights to the left are Yankee candles, and came with the adorable floral holder. They smell great, and were perfect for when I needed a little bit of calm. Finally, the pink grapefruit candle from Lilly-flame and is, as it says on the tin, 'Zingtastic'.
Ok, so I lied, I did have one more Body Shop item; this strawberry lip balm. As you would expect, it smells great. My sister knows how much I love these Mua Trio eye shadows, so she got me this merged one called Legendary. It's so pretty when you put it on! They have tiny pieces of sparkle in them that really set of your eyes, and the colours will look great on anyone. You can't really see too well in the picture, but they're a dark brown, a caramel type colour and white, all mixed with varying shades of brown.
Then come the nail stuff. Every birthday must have them, or they aren't for me. I love doing my nails a little too much! So I got Maybelline Colour Show polish in Bubblicious. This bright pink polish applies really well and gives you a great block colour. Two coats is better than one but if you need it quickly, one coat works well. They must think pink is my colour, because the next one is a Maxfactor Max Effect Mini Nail Polish in Sunny Pink. This colour is really lovely. It is a light pink with a gold/yellow shimmer, perfect for lazy summer days. Finally my new best friend, the silver Barry M nail Art Pen. I thought this would be like all the other pens, as in, it would have a tiny nib and therefore be a little difficult to apply in a way that looks good if you're doing your own nails. But I was wrong, this pen comes with a felt tip-like nib for easy application. All you have to do is push it a few times to make the colour come out and then away you go. The only problem is that it isn't too thick, so you may need to layer up to get the right amount of colour.

Finally, my sister bought me this beautiful scarf. It's completely on trend thanks to the butterfly print and she knows how much I like lace. It is a perfect buy for me, so now all I have to do is find the perfect outfit to wear it with!
Any questions about these products? Please leave me a comment and I'll get back to you ASAP.
Thanks for reading,
Kyra
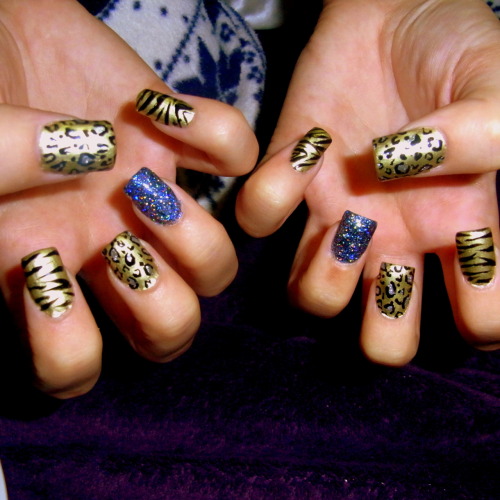
 The first is zebra print, and I think I need some extra practise! It's pretty difficult doing it on your own nails as opposed to fake ones, so they're a bit rough and ready. To get this effect, I applied two coats of white for the base colour. I think the polish was from an old manicure set that I don't use any more, nothing spectacular but it does the job! Then I used a black nail art pen by Giles (from New Look) to paint on the stripes. I think this would have worked better if I had a picture of a zebra in front of me to work from. This could have made the manicure look a lot more realistic. As it was though, everyone loved them, ad I look forward to doing more animal print soon.
 The next manicure is a little bit art-inspired. Monet-style impressionist roses and sparkly gold to go with a very pretty dress in a similar style. I love this manicure, but it took ages to do, and only on two nails! First, I applied a coat of Front Cover gold sparkle polish on each nail. Then I focused on the ring fingers. With a paint brush, I dabbed red polish on the nail to make a circle.. ish. It doesn't need to be exact, thank God. Then I highlighted using a white polish and that same brush when the first colour was dry. With the previous red paint still on it, it creates a little bit of pink that looks quite nice. Then, after cleaning the brush, I painted some light green on for the leaves, in a 'V' shape if I could. To finish off the manicure, I put some more of the sparkly gold coat on the tips of my other nails and used Gold by Giles nail art pen in gold to create a half moon.